Sunday, February 28, 2010

Reducing Waste By Adding On

This week I decided to add on to the project I worked on last week. Every week I have created a new form of a clay cane but I have never simply just added on to a cane that I have already made to create a totally different look. I got this idea from http://www.polymerclaycentral.com/cyclopedia/simpleflowercane_mia.html website where it showed me the steps to how to add on to my flower cane I made last week. The real reason why I wanted to do this project was to prevent wasting my materials. I found that when making these canes I use a great amount of clay, and then when I have made a few beads out of the canes, I still have this long cane left over. All of the different canes I have made just sit there waiting for me to make something out of them. So in order to reduce waste I decided I was going to use the example on the website and just add on to my flower cane to create a totally different and new look.


I found these extra steps to be very easy, but they made the cane look so much better. The first step I did was use my extruder tool and extrude a long square yellow cane and then a long square blue cane and cut them into 7 equal pieces and put them in alternating order of blue and then yellow and placed them around the cane and rolled it out so they were sticking to the cane. After that was done I had one more step, which was to flatten a purple piece of clay on the thickest setting of the pasta machine and wrap it around the cane. I did that and rolled the piece around the cane and took my first slice into the cane and it looked great!!! I was so excited about this design because it looked so complicated but it really wasn’t because I was just adding on to a design I had made previously.


This whole process of just adding on to my previous project reminds me of the AIDS awareness quilt we spoke about in class. Although I am one person making this project I am putting it together in pieces, just like the AIDS quilt was put together by many different people to create one quilt. I think it would be cool to have different people add on to my cane to have a finished project because then it wouldn’t just be my own work but it would be the work of many other people.


For future projects I hope to try and teach a friend how to make a clay cane and to hopefully have them add on to one of the canes I have made, and start creating a group project with many different people.


This is the cane that I started with from last week.


Here is the cane with the alternating yellow and blue stripes.


This is the final cane with all the added on elements!


These are come of the beads that I made with this cane.

Friday, February 19, 2010

Second Attempt of the Flower Cane

This week I decided I wanted to go back to the first clay beading project I attempted, which was a simple flower cane. I decided I wanted to attempt making the flower cane again because, when I made it the first time I did not have the tools and experience that I have that would make the cane aesthetically look better. I wanted to use this as a test to see if my clay skills have improved since the first project, and I would be able to compare how they look. I decided I was going to try and find another website to follow the directions off of and see if that made any difference. So I searched the web and found this great website http://www.polymerclaycentral.com/cyclopedia/simpleflowercane_mia.html where they had step by step instructions and pictures on how to make a simple flower cane, which was very similar to the one I tried weeks prior. I got my clay station ready by putting down wax paper, and began following each step the website instructed.


The first step was to roll out a log of pink clay and then cut it into 6 equal logs. I noticed on the website the picture of the pink logs looked as if they were white logs with pink wrapped around them. I wanted my cane to look exactly like the one on the website, so instead of following the exact directions I made up my own step. I used my clay extruder tool with the circle plate and extruded a long white log. Then I used the pasta machine, and on the highest setting and rolled out a sheet of pink clay and wrapped the pink sheet around the white log. After the white log was wrapped in the pink sheet, I cut it into 6 equal pieces. I did the same thing for the middle piece of the flower which was yellow clay with pink wrapped around it, but I had to roll it out so it was thinner than the white and pink logs. Without even finishing the project I was able to tell that my clay skills have improved, because I was able to look at a picture and execute how to make my project look just like the picture. For the rest of the steps I followed them exactly as they were stated on the website. The cane was finally finished and I made the first slice into the cane and was ecstatic with my results. This time around my flower cane came out just like the picture and it looked great.

This week’s project was a huge learning experience for me as well as a reassurance that my clay making skills are getting better. By going back and remaking a project that was not much of a success helped me realize that when making such intricate clay designs that it is okay to use tools to help you through the process of your work, and that doing it all by hand without any kind of helpful tools may not have the best resulting look. This project is evidence that using technology to make clay beads helps make the beads more uniform. I wanted to make my beads look uniform and have it look exactly like the picture shown on the website because, when I see the picture on the screen and then look at my actual work and they match up I feel a sense of accomplishment. I feel like I have done the project the exact way I was supposed to. The first time when I made the flower cane I saw that my project did not look like the picture on the website and I felt a sense of failure and was disappointed. Now looking back at the first cane I can now appreciate that I made that cane completely by hand without any tools or technology and although it did not look exactly like the picture on the website it was my own purely handmade creation.

For my next post I think I want to add on to the cane that I made this week, because of the website I used for this week’s project there is an extra part where you can add on to this cane and make it even better. I would also like to try and attempt teaching a friend how to make a cane and see if I have developed enough skills to teach someone and have them successfully create a clay cane.

This is from my first attempt of the flower cane. From my previous post.
These are all the logs I had to make for this flower cane.
This is the successful flower cane!
These are the different kinds of beads I made with my new flower cane!

Sunday, February 14, 2010

No Directions = Success

This week I decided that I was not going to follow any instructions on how to make a new clay cane. I decided I was going to try and see what kind of skills I have learned since I have started this project, and push my limits and do something on my own. I wanted to make a cane that was a swirl pattern for this weeks project. Since I was not using any instructions I had to think about how I would go about making the swirl. I thought for awhile on how to construct a clay cane that would look like a swirl and realized that if I picked a few colors and flattened them with my pasta tool and layered them on top of each other and then rolled it so it was formed into a cane it would probably cut and look like a swirl.


I started by flattening each individual clay color with the pasta machine. You would think that the pasta machine would be very simple and it would flatten the clay perfectly in one try. That was definitely not the case. The pasta machine has 9 different settings, where 9 is the thickest setting and 1 is the thinnest setting. I wanted each layer to be very thin where each layer would be the thickness of a number 2 setting. I learned that you can not just start with setting number 2 you have to first put the clay through setting 9 then you have to keep folding it so it does not dry out and keep putting the clay through all of the settings until you reach setting 2. I did this process with each color I used and then layered each color on top of each other. Then I took my clay razor and cut the sides so there were no stray ends and the clay was a perfect rectangle. Then I rolled the clay so it was a cane that I was able to cut. Finally it was time for me to see if my project turned out how I hoped with out using directions. I cut the cane and it turned out exactly how I expected. That was a very exciting moment for me because I realized that I was getting better with making clay canes and was able to experiment and have a success.


This weeks experience reminded me of a section in the book Handmade Nation, where Jenine Bressner shares her glass bead work. This article or section in Handmade Nation came to mind because she really reinforces the idea that it is good and okay to experiment with art forms that you can wear. It also came to my mind because she talks about how art galleries can sometimes be intimidating because the art is “put on a pedestal,” and people tend to get this feeling that they cannot make it. That was kind of the feeling I got whenever I would try to attempt a new project where I was following directions and shown the end result. I felt like there was no way that I was going to make this project look like the picture. This week since I did not follow directions and did my own thing showed me that there is nothing to be afraid of and that if you want to do something you can, and that I made what I wanted to make!


Next week you can expect me to try and attempt a more difficult clay project, where I will probably follow a set of instructions and hopefully keep succeeding.

Source:
Handmade Nation The rise of DIY, Art, Caft, and Design by Faythe Levine and Courtney Heimerl
Article: Page 22-25 By Jennine Bressner 

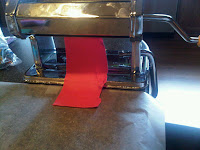
Here is one layer of clay going through the pasta machine

This is when I started to roll the finished layered clay into a cane

Here is a sliced piece of the cane. You can see it looks like a swirl

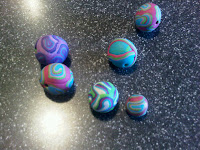
Here are a variety of different beads I made with the different swirl canes I made. 

Sunday, February 7, 2010

Week 4 Finally a Success!

This week I went to Michaels crafts and bought two new tools that would help me with my by hand project. The new tools I bought are a pasta maker and a clay extruder that comes with 17 different plates that help you extrude different shaped rods. Over the week I thought about what kinds of designs I would want to make for my next bead. I thought about the different colors I could use and thought about what I could make by using at least one of my new tools. I decided that I wanted to make something black and white because these beads someday will be turned into jewelry and black and white can go with everything.

The book I bought still had not arrived so I went back to the website http://www.sculpey.com/how-tos/techniques/simple-canes and found the perfect project for me to work on that would let me utilize one of my new tools and also use black and white for my colors. The project that I made was a checkerboard cane that I sliced to make my beads. This project was perfect because I was able to use my new clay extruder with the square plate to extrude square rods for the checkerboard.

This was a fairly easy projects because all I had to do was use my clay extruder and make a very long black square rod and cut it into 8 pieces and then do the same thing with white clay. After both the black and the white clay was extruded and cut into 8 pieces that were the same length I then put a white and a black piece and stuck them together so they were side by side. Then I did it to another black and white piece and then put them on top of each other so the colors were alternating. I did that three more times with the rest of the square rods and then put all four pieces together so it created one big checker board rod.

At first the rod was very thick because it was not stretched out, but then I gently stretched it out so that it was longer and thinner. After I sliced the pieces of the cane off I rolled them gently on a small clay ball and then made a hole so I could make it into some kind of jewelry. I tried something new this week. I made a bead that was square. All I did was slice a much thicker piece from the checker cane and poked a hole in it so it was a square bead.  Just like last week I baked them in the oven for 20 minutes so they hardened and were ready to use.

This weeks project I would say was the most successful project I have made so far. My project turned out just like it showed on the website. I think one of the reasons why my project came out so well is because I had the clay extruder. Some people might not understand why I need the clay extruder. Having the clay extruder makes making clay canes so much easier and makes the project come out much better. When making clay canes you have to be very precise and make sure you are doing it the exact way the directions show, because if you make your rods for the cane a little bit different from what is shown your project could turn out totally different.  

For next week I plan on using my other tool the pasta maker, and hopefully I will have the book I ordered and having been waiting for to browse new designs. I hope next weeks project will go just as smoothly as this weeks went.


This picture is from the website on how to make the checker cane


This is my new clay extruder I used, with all of its different plates


This is how my checker cane came out


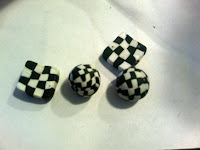
These are some of the beads I made!